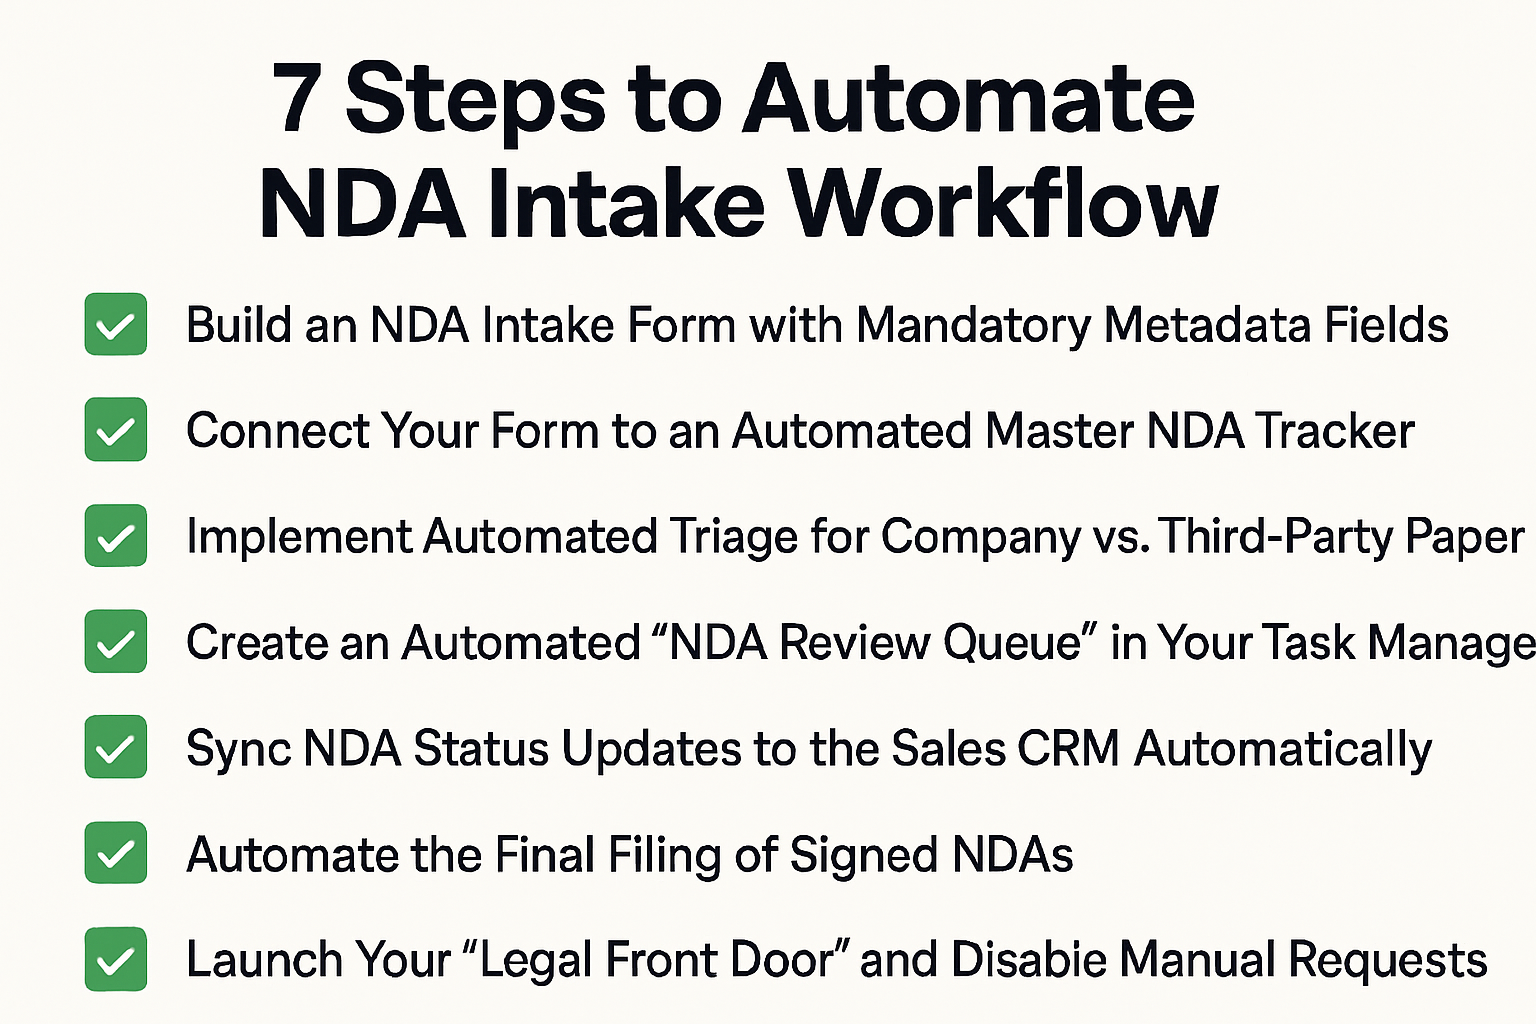
7 Steps to Automate NDA Intake for Legal Teams
If you are working in a small legal team or as a solo General Counsel, chances are you feel the constant pressure of the administrative chase.
This often looks like NDA requests arriving through scattered channels like Slack or email without the necessary context you need to actually start your work.
If that is you, you are not alone.
To help you reclaim your time, here is a 7-step workflow to automate your NDA intake:
1. Build an NDA Intake Form with Mandatory Metadata Fields
- Use Slack Workflow Builder, Google Forms, or Microsoft Forms to create your primary entry point.
- Add “Required” fields for: Counterparty Legal Name, Project Purpose, and Internal Sponsor.
- Include a field for the CRM Opportunity URL or Record ID so the automation can find the deal later.
- Enable a file-upload field specifically for the .docx draft of the third-party NDA.
2. Connect Your Form to an Automated Master NDA Tracker
- Create a spreadsheet (Google Sheets or Airtable) with headers matching your form fields.
- Use Zapier or Make.com to create an automation with the trigger: “New Form Response.”
- Set the action to “Create Spreadsheet Row” and map your form fields directly to the corresponding columns.
3. Implement Automated Triage for Company vs. Third-Party Paper
- Add a “Filter” or “Router” step in your automation tool based on the form question: “Are you using our Company NDA Template?”
- Route A (Company Paper): Set an automated email reply to send the rep your standard NDA link and signature instructions.
- Route B (Third-Party Paper): Trigger an instant alert to your private “Legal Review” Slack channel with a direct link to the uploaded document.
4. Create an Automated “NDA Review Queue” in Your Task Manager
- Add an action to your automation workflow to “Create a Task” in your project management tool (Asana, Trello, or Todoist).
- Configure the task title to include the counterparty name and the “Purpose” for easy prioritization.
- Link the task directly to the document stored in your cloud drive (Google Drive or OneDrive) so you can open it in one click.
5. Sync NDA Status Updates to the Sales CRM Automatically
- Connect your Master NDA Tracker spreadsheet back to your CRM (Salesforce or HubSpot) via Zapier.
- Set an automation to trigger whenever the “Status” column in your spreadsheet is changed (e.g., to “In Review”).
- Use the CRM Record ID captured in Step 1 to “Find and Update” the corresponding deal status in the CRM automatically.
6. Automate the Final Filing of Signed NDAs
- Enable the integration between your e-signature tool (DocuSign/HelloSign) and your cloud storage (Google Drive/SharePoint).
- Configure the naming convention in your e-signature settings to automatically title files as: [Counterparty Name] - [Date].
- Set a folder rule to automatically save “Fully Executed” NDAs to a specific “Signed NDAs” folder.
7. Launch Your “Legal Front Door” and Disable Manual Requests
- Once the workflow is tested, set your email auto-responder and Slack status to: “All NDA requests must be submitted here: [Link to Form].”
- Explicitly refuse to review any ad-hoc email or Slack-based requests to ensure 100% adoption of the new system.
Closing Thoughts
We hope this article helps you reclaim some of your bandwidth and cut through the daily noise of NDA requests.
If you would like to see a fully automated version of this workflow in action, feel free to check out our contract negotiation software for small legal teams.
Otherwise, once your intake is organized, feel free to check out our next article on how to auto-redline NDAs with AI.
See it in action
Turn contract chaos into a streamlined workflow
Join legal teams who cut contract turnaround time by 60%. Book a 15-minute demo to see how.