Reviewing a Vendor NDA
A new vendor sends you their standard NDA. Your job: review it against your organization’s requirements, flag non-compliant clauses, negotiate changes, get internal approval, and send it back signed. This walkthrough covers the entire flow in Pactly, from upload to execution.
Step 1: Upload the Vendor’s NDA
Section titled “Step 1: Upload the Vendor’s NDA”Click Create in the top-left corner of the contract repository. Select Review a Third-party Contract.
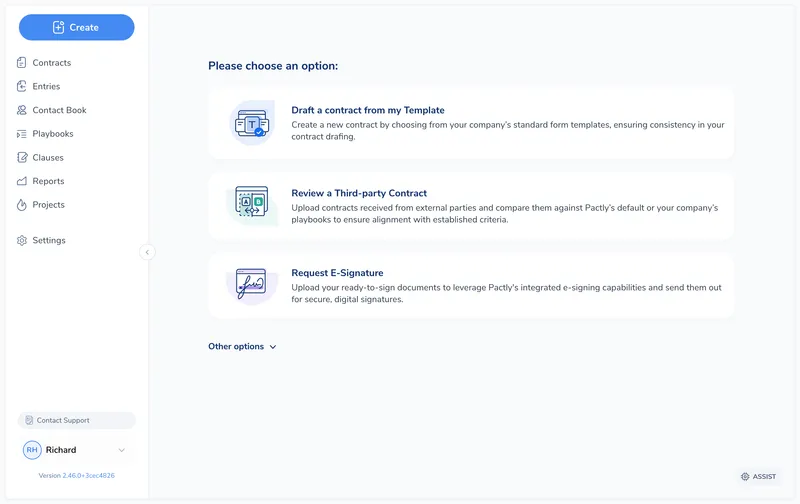
Upload the .docx file the vendor sent, give it a descriptive name (e.g., “Acme Corp NDA”), select the NDA category, and choose the playbook to review against.
The contract appears in your repository with In Review status. Pactly automatically runs keyword matching against the playbook positions to identify relevant clauses in the document.
Step 2: Run a Playbook Review in Word
Section titled “Step 2: Run a Playbook Review in Word”This step takes place in Microsoft Word with the Pactly Assist add-in.
Open the contract in Microsoft Word. Launch Pactly Assist from the ribbon and run the playbook review. The AI reads the entire NDA and evaluates each clause against every position in your playbook.
Within a minute or two, you get a prioritized list of findings for each playbook position:
| Result | What it means |
|---|---|
| Compliant | The clause meets your organization’s requirements for this position |
| Non-Compliant | The clause does not meet requirements. The review shows what is wrong and suggests alternative language from your clause library. |
| Uncertain | The AI could not make a confident determination. Flagged for human review. |
| Not Applicable | The position does not apply to this contract (e.g., a data processing position checked against an NDA that does not involve data sharing) |
For each non-compliant position, you can view the specific clause in the document, see the AI’s justification, and insert your preferred alternative language directly from the clause library.
See Running a Playbook Review for detailed steps on using the Word add-in.
Step 3: Redline the Document
Section titled “Step 3: Redline the Document”Based on the playbook review results, mark up the document in Word:
- Accept clauses flagged as compliant (no changes needed)
- Redline non-compliant clauses using your preferred language from the clause library or your own edits
- Add comments explaining your proposed changes to the counterparty
- Flag uncertain items for discussion with a colleague before deciding
When you are done with your edits, create a new round in Pactly Assist. This captures the current document state as a negotiation round and records it on the contract timeline.
Step 4: Send to the Vendor and Track Rounds
Section titled “Step 4: Send to the Vendor and Track Rounds”Send your marked-up version to the vendor. You can use Send Message from the contract’s timeline to email the document directly from Pactly (keeping the exchange tracked), or send via your regular email client.
When the vendor returns their response, upload it as a new round. Pactly tracks each exchange:
- Round 1 (Received): The vendor’s original document
- Round 2 (Sent): Your redlines and comments
- Round 3 (Received): The vendor’s response
- …and so on until terms are agreed
At any point, you can compare rounds to see exactly what changed between exchanges. The Document tab shows all rounds and provides a side-by-side comparison.
Step 5: Get Internal Approval
Section titled “Step 5: Get Internal Approval”If your organization has approval workflows configured, Pactly routes the contract to the right approvers based on your rules. For example, NDAs with non-standard liability caps might require Legal Director approval, while standard NDAs might be auto-approved.
Approvers see the contract with full context: the current document, negotiation history, playbook review results, and any notes on the timeline. They can approve, reject with comments, or reassign to another approver.
The contract moves to Pending Approval status during this step. Once all required approvals are obtained, it advances to Pending Signature.
Step 6: Finalize and Send for Signature
Section titled “Step 6: Finalize and Send for Signature”When both sides agree on the terms, finalize the contract. You can either continue with the latest version already in Pactly, or upload the final agreed document.
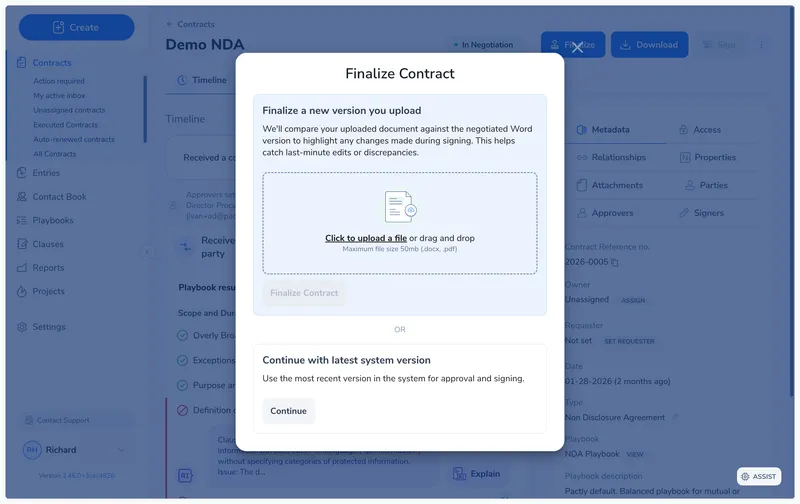
If you upload a new version, Pactly runs an automatic discrepancy check comparing it against the last negotiated round. This catches any unexpected changes that may have been introduced in the “clean” version.
After finalization (and approval, if required), send the contract for e-signature. Choose your integration (DocuSign, Adobe Sign, SignWell, or Pactly e-Sign), add the signers, and send.
Pactly tracks signature events on the timeline. When all parties sign, the contract automatically moves to Executed status and the signed document (PDF) is stored on the contract record.
- Run the playbook review before reading the document yourself. Let the AI catch the mechanical issues (liability caps, indemnification, governing law) so you can focus your attention on commercial and strategic clauses.
- Add notes during negotiation, not after. When you make a concession (“Accepted their limitation period because deal value is under threshold”), record it immediately on the timeline. It saves hours of context-rebuilding later.
- Use the clause library instead of rewriting. If your playbook flags a non-compliant clause, insert the pre-approved fallback language from the clause library. It is already reviewed and saves editing time.
- Always check the discrepancy report. After finalization, review the comparison to confirm the executed version matches what was negotiated. This catches accidental or intentional last-minute changes.
- Track communication on the timeline. Use Send Message for counterparty correspondence so the full exchange is recorded. If you use your regular email client, forward the thread to the contract’s Pactly email address to keep the timeline complete.