Single Sign-On with Microsoft Entra ID
Without single sign-on, every Pactly user is one more password your organization has to provision, reset, and revoke by hand. When someone leaves, their Pactly account lingers until an admin remembers to deactivate it.
Single sign-on (SSO) hands authentication to Microsoft Entra ID (formerly Azure AD). Users sign in with their existing Microsoft credentials — in the Pactly web app and the Pactly Word Plugin alike — and accounts can be created and removed automatically.
Before you start
Section titled “Before you start”SSO settings live in the left menu under Account settings → Single Sign-On. The section is available to admins on accounts where the integrations capability is enabled. SSO is available on Ultimate plans and above, and as an add-on for Growth.
You also need:
- Verified, locked domains. SSO applies to email domains your company has verified and locked in Account settings → Company. Verify and lock the relevant domains first, or only existing users will be able to sign in with SSO. See Verify and lock your domains.
- Access to your Azure portal, if you plan to use your own app registration (most enterprise setups do).
Step 1: Turn on SSO, set the tenant and button label
Section titled “Step 1: Turn on SSO, set the tenant and button label”- Go to Account settings → Single Sign-On.
- Switch the toggle from SSO Disabled to SSO Enabled.
- Enter your Tenant ID — the Directory (tenant) ID shown on your Azure portal’s Entra ID overview page. SSO cannot be saved without it, so Pactly keeps the Save buttons disabled until it is filled in.
- In Display Name, enter the text users will see on the sign-in button, for example
Microsoftor your company name. - Click Save.
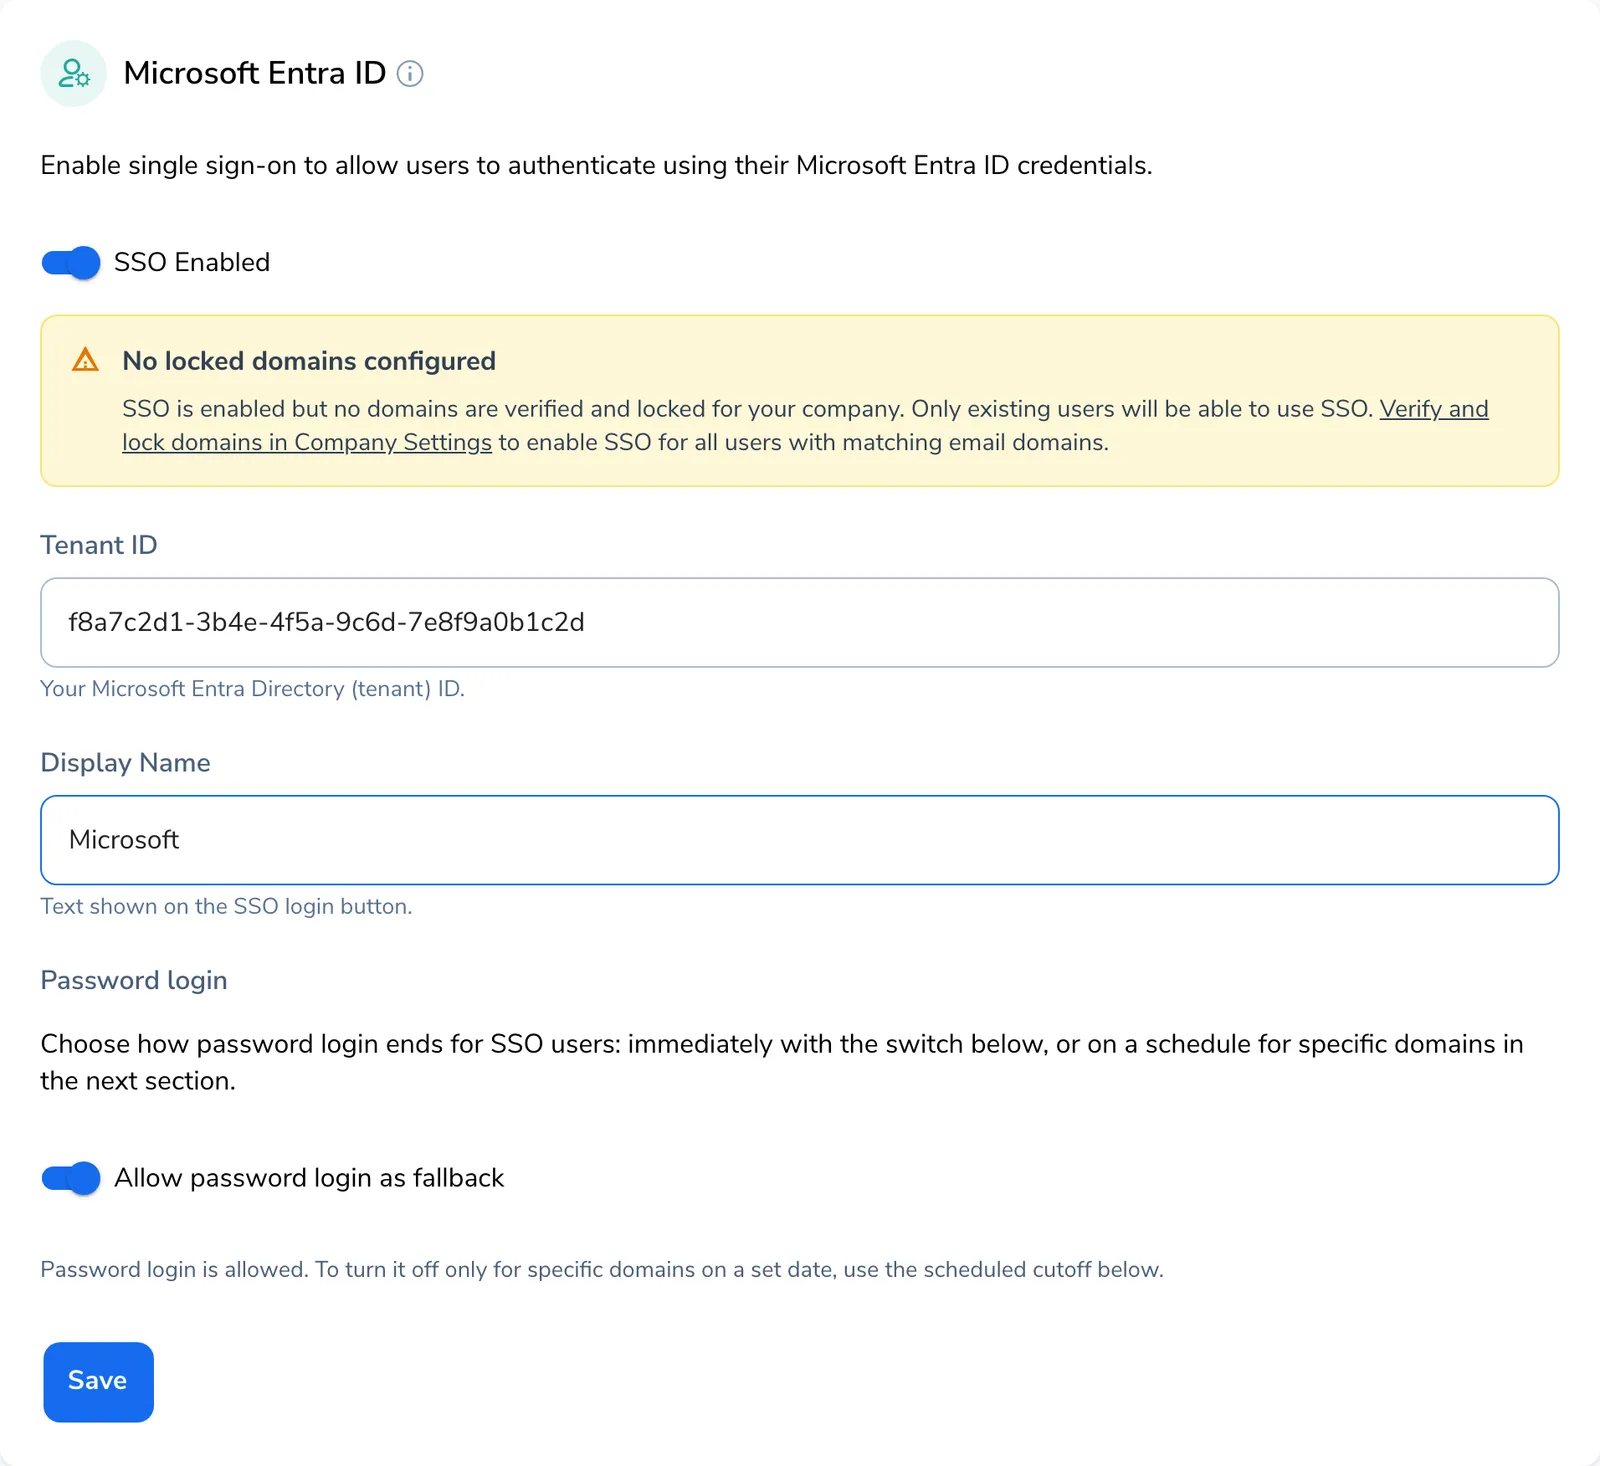
Once SSO is enabled, Pactly shows whether your verified domains are covered. If no domains are locked yet, you’ll see a reminder that only existing users can use SSO until domains are verified and locked.
Step 2: Choose an app registration
Section titled “Step 2: Choose an app registration”Pactly connects to Entra ID through an Azure app registration. Under App Registration, you choose which one.
Use Pactly’s multi-tenant app
Section titled “Use Pactly’s multi-tenant app”The simpler path. Pactly’s pre-built app runs against the tenant you entered in Step 1. No secret to manage — leave the toggle on Use Pactly’s multi-tenant app and there is nothing further to configure.
If your organization restricts app consent (common in enterprise tenants), sign-ins fail with a Microsoft consent error until an Entra administrator approves Pactly’s app. Once your Tenant ID is set, the App Registration card shows the admin consent link in a copyable field — click it to select the URL (or use Copy) and send it to an Entra administrator to open and accept. One approval covers the whole tenant.
Use a custom Azure AD app
Section titled “Use a custom Azure AD app”Full control. You register your own app in Azure and supply its credentials. Required when your security policy mandates a self-managed app registration.
- Switch the toggle to Use custom Azure AD app.
- Enter the Client ID from your Azure app registration (it must live in the tenant you entered in Step 1).
- Enter the Client Secret value you generated in Azure.
- Optionally set the Client Secret Expiry Date so Pactly can warn you before it lapses (see below).
- Click Save.
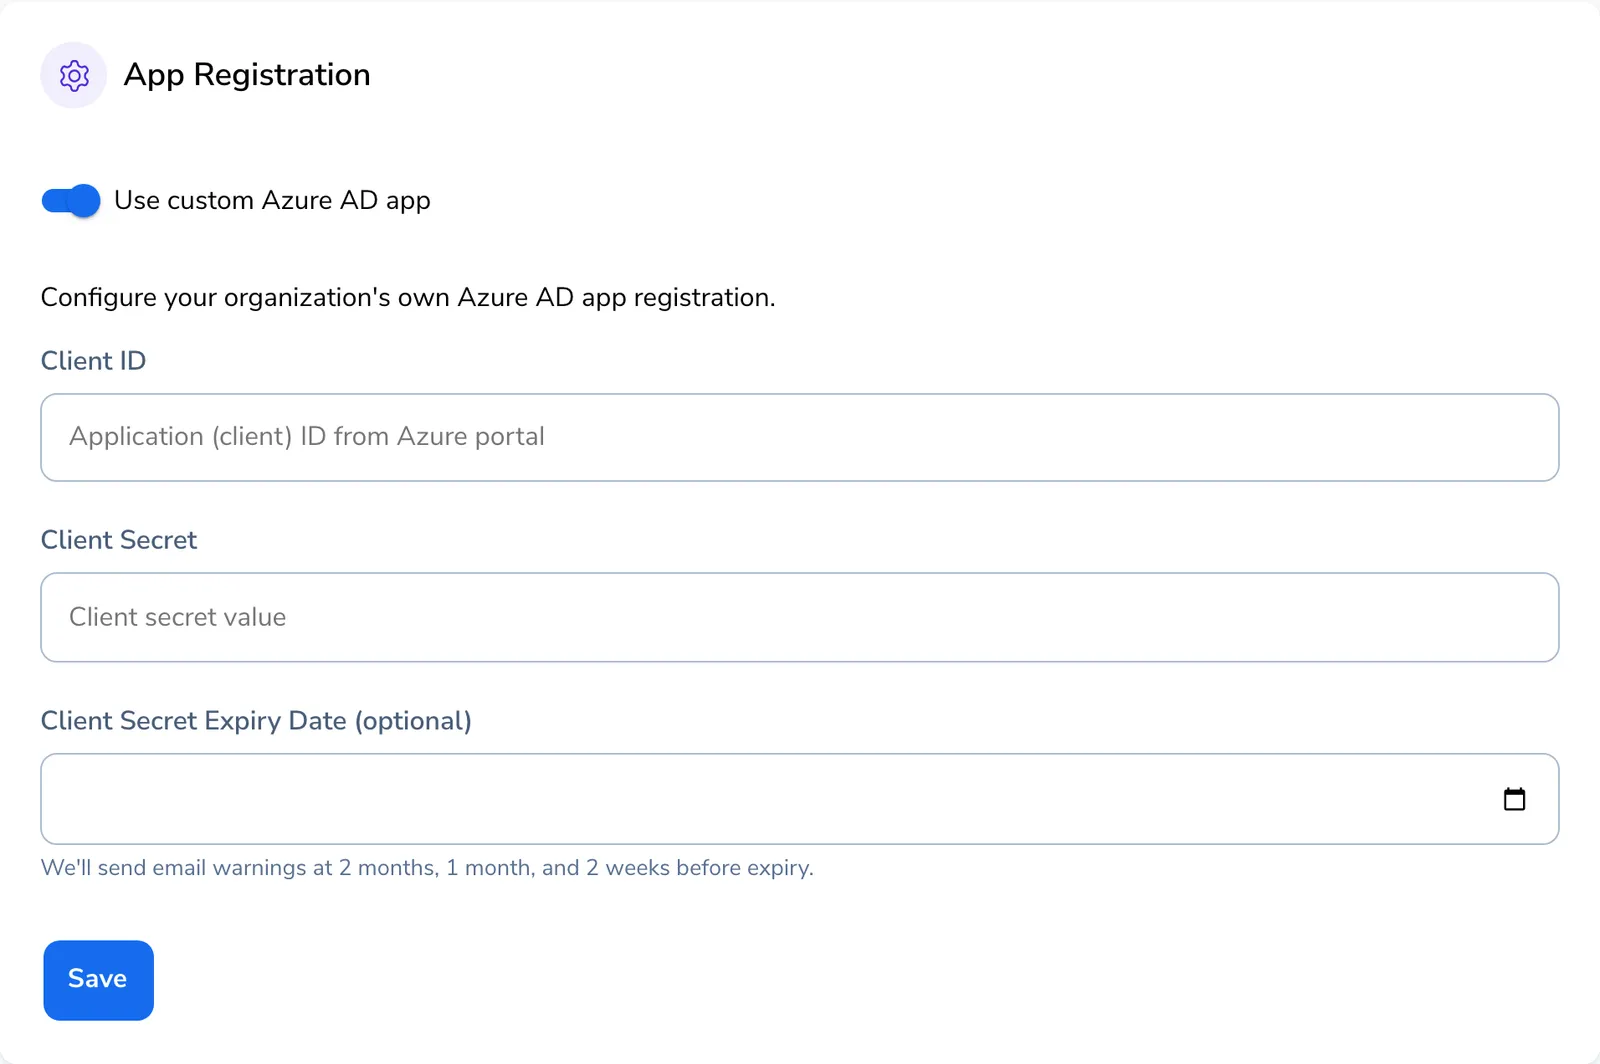
Azure client secrets expire on the date you set in the Azure portal, and SSO stops working when one lapses, locking out users on SSO-only domains until you enter a new one. Record the Client Secret Expiry Date so your account’s default admin is emailed at 2 months, 1 month, and 2 weeks before expiry, then rotate the secret in Azure and enter the new value before it lapses. The Client Secret field shows when a secret is already configured; enter a new value only when rotating it.
For the full Azure-side walkthrough (creating the app registration, redirect URI, optional claims, and troubleshooting sign-in errors), see Entra ID App Setup for SSO (OIDC).
When you use a custom app, Pactly also shows an Azure AD Setup Guide box. It walks through adding the given_name, family_name, and email optional claims to your app’s token configuration so user names sync correctly, and lists the redirect URI your app needs (your Pactly API host followed by /oidc/callback).
Step 3: Decide on password fallback
Section titled “Step 3: Decide on password fallback”Under the main SSO box, the Allow password login as fallback toggle controls whether users on your locked domains can still sign in with a Pactly password:
- Allow password login as fallback: users can choose SSO or password.
- SSO only (no password fallback): users on locked domains must use SSO; password login is disabled for them.
Schedule a password cutoff by domain
Section titled “Schedule a password cutoff by domain”Turning off password fallback for everyone at once is abrupt: anyone who has not yet tried SSO is locked out the moment you save. A scheduled password cutoff is the safer way to enforce SSO on a deadline. You pick the exact date and time password login stops for a domain, and until then both methods keep working, so users have a grace period to migrate.
You choose which of your verified and locked domains the cutoff applies to, plus a cutoff date and time. You enter the time in your own timezone, and Pactly stores it internally as UTC. Domains you do not select are left alone.
Before the cutoff, users on the selected domains can sign in with either SSO or a password, exactly as they do today. After the cutoff, those domains require a fresh SSO sign-in and password login stops working for them, the same end state as SSO only but reached on your schedule rather than all at once.
The cutoff only takes effect while Allow password login as fallback is on, since it governs when that fallback ends for the selected domains. If you have already turned fallback off, users on your locked domains must use SSO immediately anyway, so there is nothing for a cutoff to schedule.
Step 4: Choose which domains see the SSO button (optional)
Section titled “Step 4: Choose which domains see the SSO button (optional)”By default, everyone in your organization is offered SSO at sign-in. That’s right for most setups — but some organizations have verified domains whose users don’t exist in the Entra tenant at all (for example, a subsidiary or affiliated institution with its own directory). For those users, the SSO button is a dead end: it can only fail, and it confuses them.
The SSO sign-in visibility card fixes this. Switch it from All domains see SSO sign-in to Only selected domains see SSO sign-in and tick the domains whose users actually have Entra ID accounts:
- Selected domains are offered SSO as usual (with or without password fallback, per Step 3).
- Everyone else — unselected domains and any other email domain — goes straight to the password step and never sees the SSO button. Password login always stays available to them, even when Step 3 is set to SSO only: hiding SSO from a domain carves it out of the SSO rules entirely, so those users can’t be locked out.
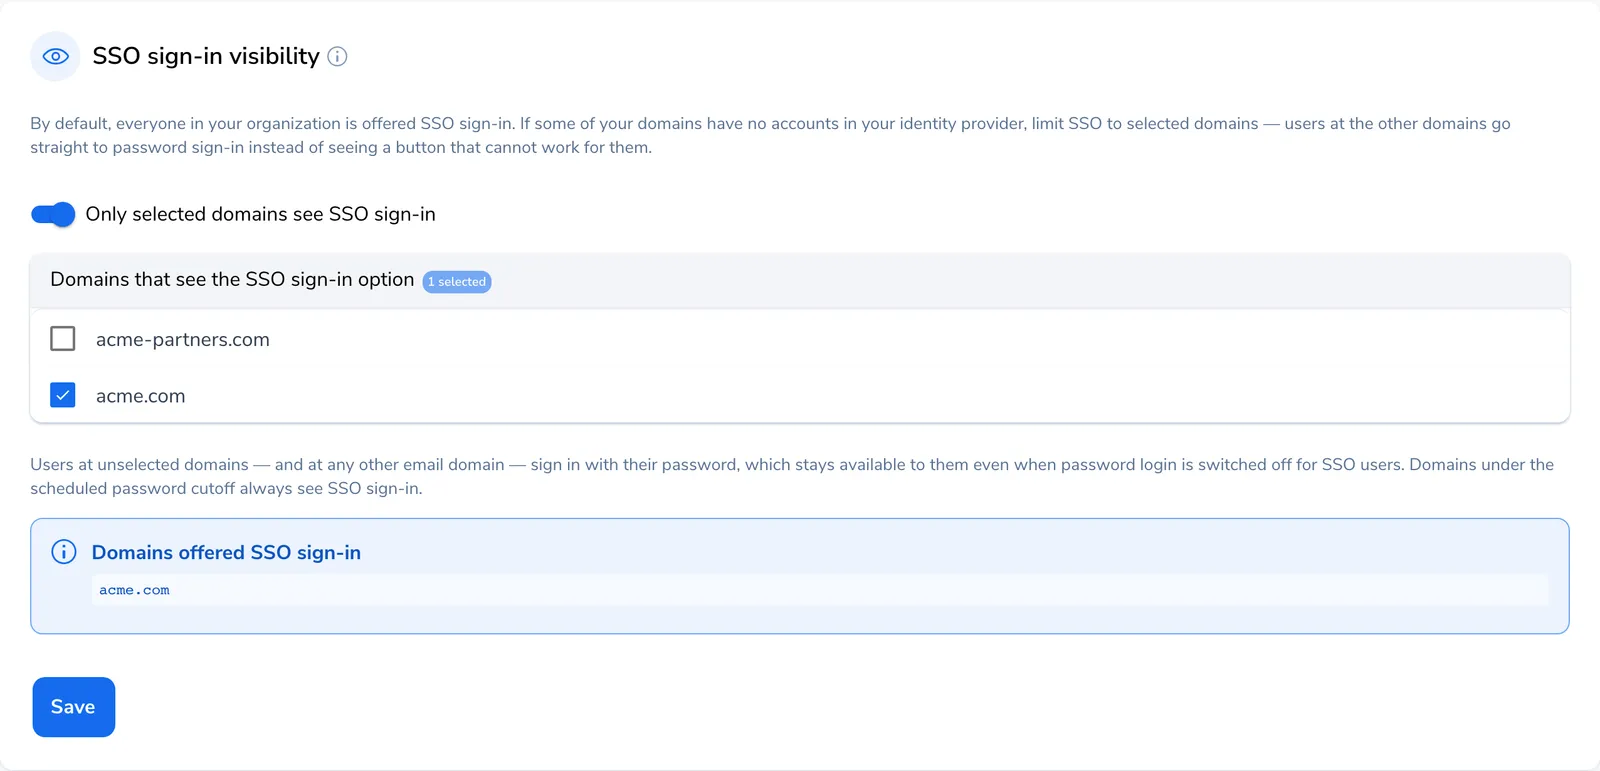
Only domains that are verified and locked can be selected, and domains under a scheduled password cutoff always see SSO sign-in (the cutoff requires it). Leave the switch on All domains see SSO sign-in unless you have a domain that genuinely can’t use SSO.
Step 5: Provision users automatically
Section titled “Step 5: Provision users automatically”Found under User Provisioning, Pactly offers two ways to create and remove accounts without manual admin work. They are independent, and you can use either or both.
Just-In-Time (JIT) provisioning
Section titled “Just-In-Time (JIT) provisioning”JIT creates a Pactly account the first time a new person signs in through SSO, so you don’t pre-create users.
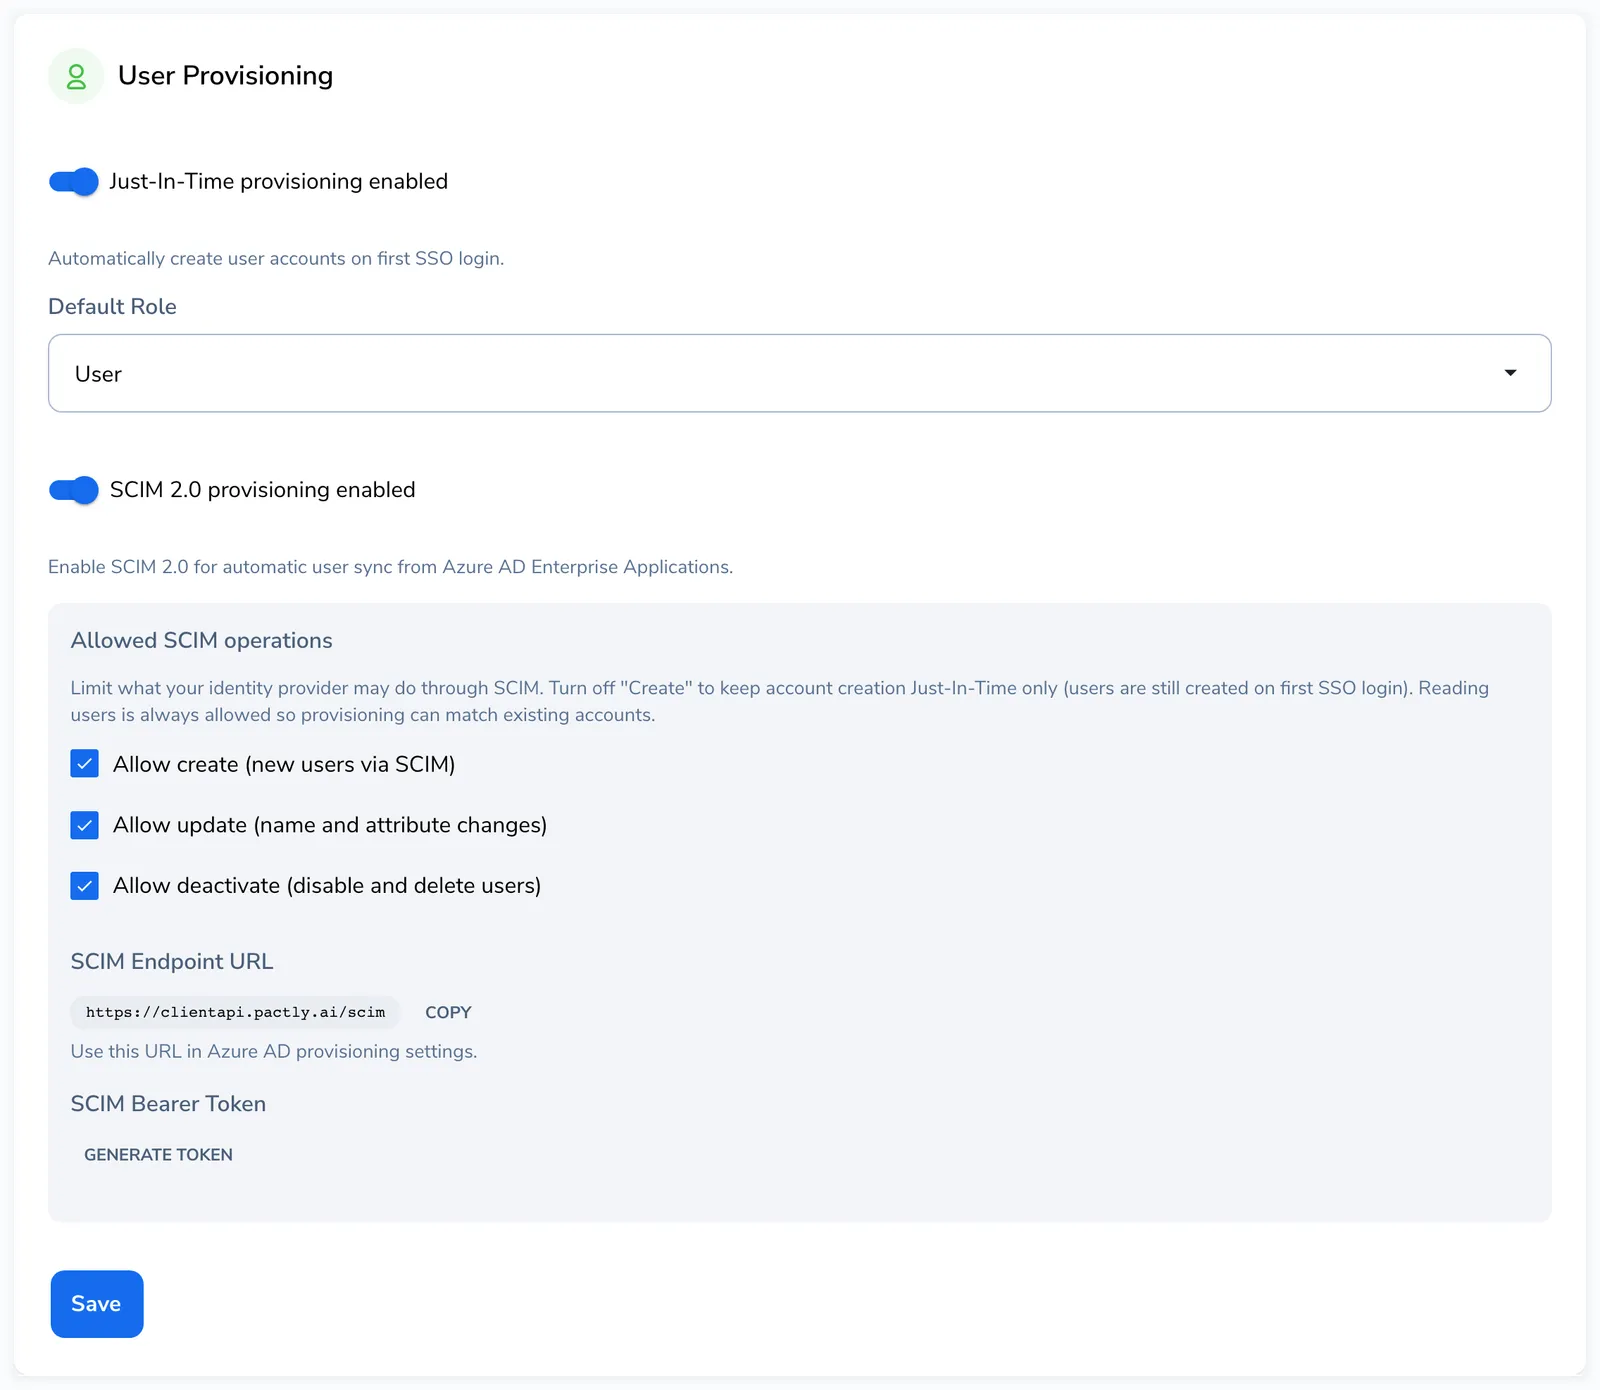
- Switch Just-In-Time provisioning to enabled.
- Set the Default Role new users receive on first sign-in (User, Manager, Approver, Lite, Viewer, or Requester).
- Click Save.
Everyone who signs in for the first time lands with this role, so set it to what your typical user should have. You can change individuals afterward in User management.
SCIM 2.0 provisioning and deprovisioning
Section titled “SCIM 2.0 provisioning and deprovisioning”SCIM lets Entra ID push user changes to Pactly directly: it creates accounts when you assign someone to the provisioning app in Entra ID, and deactivates them when you unassign or offboard the person. This is how you make sure leavers lose Pactly access automatically. On the Entra side, provisioning runs through a small dedicated enterprise application you create there (separate from the SSO app — the SCIM guide walks through it).
- Switch SCIM 2.0 provisioning to enabled.
- Copy the SCIM Endpoint URL shown, and paste it into the provisioning settings of that dedicated app in Entra ID.
- Click Generate Token to create a SCIM Bearer Token, then copy it into the same Entra provisioning settings.
- Click Save.
For the full walkthrough, including the Entra ID provisioning setup, allowed SCIM operations, attribute mapping, and deprovisioning behavior, see SCIM user provisioning.
What users see when they sign in
Section titled “What users see when they sign in”Pactly’s sign-in is email-first: the user enters their email, and Pactly then routes them to the right method based on their domain.
SSO route Optional MFA · the same sign-in covers the web app and the Pactly Word Plugin; the one-time code is multi-factor authentication, not a passwordless login
If their domain is set up for SSO — and offered it, per Step 4 — Pactly routes them to the button labeled with your Display Name instead of asking for a password. When you leave Allow password login as fallback on, users on those domains can still reach a Pactly password from the SSO screen; only SSO only removes that option. Users on domains you excluded in Step 4 get the plain password step, exactly as if the organization had no SSO. The same sign-in covers the Pactly web app and the Pactly Word Plugin, which opens a Microsoft sign-in popup and returns to the add-in once authenticated.
For the end-user sign-in experience, see Signing in to Pactly.
API keys and webhooks
Section titled “API keys and webhooks”SSO governs how people sign in. For programmatic access (API keys, webhooks), see the Pactly developer documentation. Those are configured separately and are not part of SSO.