1
Open the SSO settings
In the left menu, open Account settings and click Single Sign-On. Scroll to the User Provisioning card.
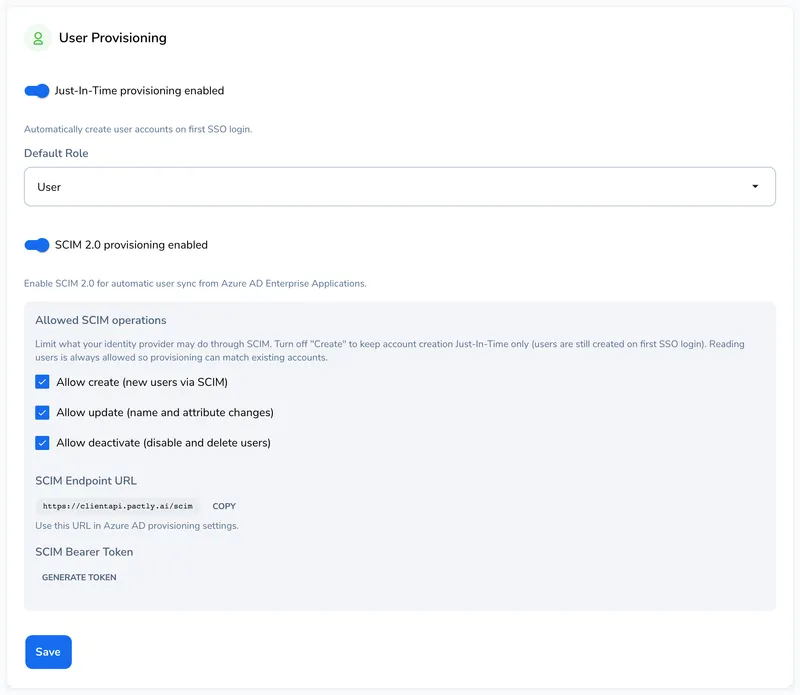
When people join or leave your organization, someone has to mirror that in Pactly by hand: create the account, fix the name, remember to deactivate it. SCIM removes the manual step. Your identity provider pushes user changes to Pactly directly, so assigning someone to the Pactly app creates their account, and offboarding them cuts their access automatically.
Pactly implements SCIM 2.0 for user provisioning from Microsoft Entra ID (formerly Azure AD). SCIM can create users, update their names and directory attributes, deactivate them, and reactivate them. Provisioning covers users only: groups are not synced over SCIM.
Everything on the Pactly side lives in one card: Account settings → Single Sign-On, under User Provisioning.
In the left menu, open Account settings and click Single Sign-On. Scroll to the User Provisioning card.
Switch the SCIM 2.0 provisioning toggle to enabled. The SCIM configuration fields appear below it.
Click Copy next to the SCIM Endpoint URL. You will paste this into Entra ID in the next section.

Click Generate Token. The token appears once, with Show, Copy, and Regenerate controls. Copy it somewhere safe for the next section.

Click Save at the bottom of the card so the provisioning settings take effect.
SCIM provisioning runs through an enterprise application in your Entra tenant, and it is always a new one you create just for provisioning — don’t go looking for an existing Pactly app to configure. If you use Pactly’s multi-tenant app, there may be no Pactly application in your tenant at all (one only appears after admin consent or the first sign-in), and even then, neither it nor a custom SSO app registration can be configured for automatic provisioning — Entra ID only offers that on gallery apps and on non-gallery apps created through Create your own application. So, whichever SSO model you chose, create the provisioning app fresh and wire it to the endpoint and token from Step 1:
Pactly Provisioning, choose Integrate any other application you don’t find in the gallery (Non-gallery), and click Create.Before you start provisioning, decide two things: who gets pushed to Pactly, and which operations Entra ID is allowed to perform. Both are set in the provisioning app you just created.
department equals Legal. Useful when you assign a broad group but only part of it should have Pactly accounts.In the provisioning app, open Attribute mapping (on the classic page it’s called Mappings). It lists a mapping per object type — one for users, one for groups. Open the users mapping. Near the top, the Target Object Actions checkboxes — Create, Update, Delete — control which operations Entra ID attempts against Pactly:
While you’re in Attribute mapping: Pactly does not sync groups, so open the groups mapping and set Enabled to No. This stops Entra ID from attempting group operations that Pactly would reject anyway.
Pactly has a matching set of switches — Allowed SCIM operations, described below. Set both sides consistently: the Entra checkboxes stop an operation from being attempted, and the Pactly switches stop it from succeeding even if the directory attempts it. Doing it only in Entra works, but the Pactly side is the enforcement you control.
Under the provisioning configuration’s properties (Edit properties / Set properties on the overview), set a notification email and the accidental deletion threshold. If a sync would deactivate more accounts than the threshold, Entra ID pauses provisioning and alerts you instead — cheap insurance against a mis-scoped group unassigning your whole company.
Entra ID runs an initial sync and then provisions changes on its own cycle (roughly every 40 minutes). Assigned users appear in Pactly’s User management as they sync.
You don’t have to wait for the cycle to test: Provision on demand in the provisioning app’s left menu pushes a single user to Pactly immediately. Pick a test user there, confirm they appear in User management, and you know the connection works end to end.
By default, an enabled SCIM connection has full permissions: create, update, and deactivate. Under Allowed SCIM operations you can switch off any of the three independently. Reading users is always allowed, so Entra ID can match accounts that already exist.
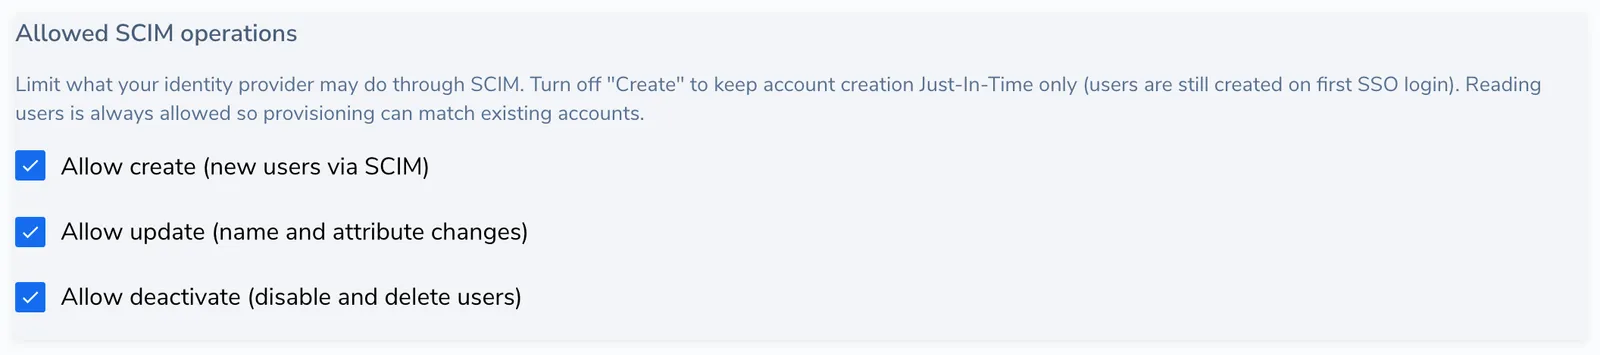
When an operation is switched off, Pactly skips that part of the sync and answers the identity provider with a permission error for requests that only attempt the forbidden operation. These switches are the enforcement side of the same decision as Entra ID’s Target object actions (above) — mirror your choice there too, so Entra ID doesn’t keep attempting operations that Pactly refuses and filling the provisioning log with errors.
| SCIM attribute | In Pactly |
|---|---|
userName (or primary email) | Email address |
name.givenName | First name |
name.familyName | Last name |
externalId | Linked to the Entra ID user object, used to match the account on later syncs |
active | Whether the account is active or deactivated |
Enterprise attributes (department, title, employeeNumber, and similar) | Shown read-only as Organization info on the user’s profile and in User management, marked “Managed by SSO”. Informational only — they don’t affect roles or permissions |
Users created over SCIM receive the Default Role configured under Just-In-Time provisioning in the same User Provisioning card (User, Manager, Approver, Lite, Viewer, or Requester). You can change an individual’s role afterwards in User management; see User roles for what each role can do.
When you unassign someone from the provisioning app in Entra ID (or offboard them), SCIM deactivates the Pactly account and ends their active sessions. They can no longer sign in, and their contracts and history stay intact.
Two rules protect against surprises:
For integrations other than Entra ID’s built-in provisioning, Pactly exposes a standard SCIM 2.0 REST API. Every request authenticates with the bearer token from Step 1 in an Authorization: Bearer header. The base URL is the SCIM Endpoint URL shown in your SSO settings.
| Method and path | Purpose |
|---|---|
GET /ServiceProviderConfig | Capability discovery |
GET /Schemas | Supported schemas (core User and enterprise extension) |
GET /Users | List users, with filtering and pagination |
POST /Users | Create a user |
GET /Users/:id | Fetch one user |
PUT /Users/:id | Replace a user’s attributes |
PATCH /Users/:id | Partial update (replace operations) |
DELETE /Users/:id | Deactivate a user |
Notes for SCIM client implementers:
userName eq "value" and externalId eq "value".startIndex (1-based) and count (maximum 100 per page).PATCH supports replace operations on active, name.givenName, name.familyName, and externalId.GET /Groups always returns an empty list and group writes return 501: Pactly provisions users only.DELETE is a soft-delete: it deactivates the account, identical to active: false.